Autoformatting with Husky.NET
Automating formatting on commit with dotnet format, git and Husky.NET
Introduction
Formatting code is a perennial issue. Some people love to get everything just right for readability - and I am one of those. And some think that this is just wasting time and introducing diffs with no actual content. And they also have a point. I don’t think that this point is wrong as such, we just have different priorities. And that it’s OK for different people to have different priorities when working together: we don’t have to work the exact same way, we just have to have synergy of approaches.
But the better answer to keep everyone happy is to automate it, so that formatting happens consistently without wasting time.
We’ll assume that you have an .editorconfig file with preferred styles in the repository. That’s a separate topic so we’ll assume that it’s already covered. The good news is that dotnet format will use this file’s settings.
What should happen is that when making a git commit, then dotnet format should be run over the changed files. And only the changed files!
This can be done by glueing git and dotnet format together using a tool called Husky.NET, which can be used to run command-line tools including dotnet format on git’s pre-commit hook.
Husky.NET is a “dotnet tool” so it is hosted on nuGet and installed via the dotnet command line.
Here’s how
Here are the step-by step instructions. We will assume that you have a repository checked out from git in a local folder e.g. C:\Code\SomeRepository. And that you have a recent version of the dotnet command line installed, such that dotnet format works.
1: Prepare the repository to use dotnet local tools
First, prepare the repository to use dotnet local tools by creating a tools manifest. It goes like this:
cd C:\Code\SomeRepository
dotnet new tool-manifest

NB: if you already have a tools manifest, this command can be skipped. In this case it will fail with an error message like this:
Creating this template will make changes to existing files:
  Overwrite   ./.config/dotnet-tools.json

To create the template anyway, run the command with '--force' option:
If you see this message, you’re already good and can move on to the next step.
2: Install husky
In the same repository folder, run:
dotnet tool install Husky
dotnet tool restore
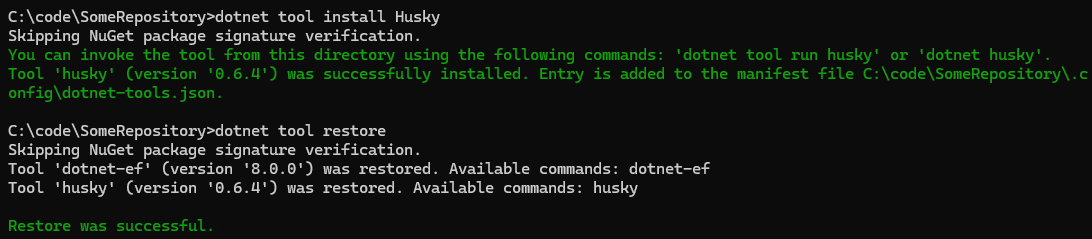
This will create an entry for husky in the tools manifest at C:\code\SomeRepository\.config\dotnet-tools.json. Husky is now a local tool in the solution.
3 Configure Husky
Configure husky to run on the pre-commit git hook
dotnet husky install
dotnet husky add pre-commit -c "dotnet husky run"

There should now be a folder C:\code\SomeRepository\.husky with files pre-commit and task-runner.json
4 Configure the pre-commit action
Configure the pre-commit action to run a dotnet format on changed .cs files. Edit the file .husky/task-runner.json created by the last step, set the contents to:
{
   "tasks": [
      {
         "name": "dotnet-format",
         "group": "pre-commit",
         "command": "dotnet",
         "args": ["format","--no-restore", "--include", "${staged}"],
         "include": ["**/*.cs"]
      }
   ]
}
5 Try it out
Time to play! Create out a new disposable branch and change a file.
Change a .cs file and make a commit: it should run dotnet format on the changed file!
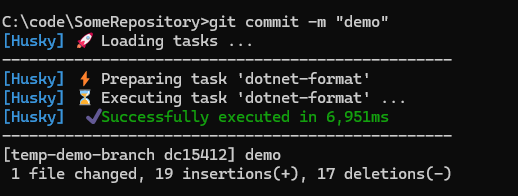
Now work as before, and husky formatting will kick in when needed, on only the files that are part of the commit. This should work with multiple different git tools. I use a mixture of command line git and the TortoiseGit GUI, and it works fine with both.

Troubleshooting
Dual Use
If you work on the same files in both Windows and WSL Linux command line (I often use git in this way), then it should all work. But you may need to run this a second time, so that it has been executed on both environments:
dotnet tool install Husky
dotnet tool restore
Solution filters
If you are using solution filters, you can have a solution (a .sln file) and one or more solution filters ( .slnf files) in the same folder. In this case, dotnet format will fail with an error as it doesn’t know which one to choose:
Multiple MSBuild solution files found in 'C:\code\SomeRepository\'.
Specify which to use with the <workspace> argument.
In this case, include the .sln file in the dotnet format command line, In task-runner.json change the args line to have your solution file as the arg after format:
"args": ["format", "SomeCode.sln", "--no-restore", "--include", "${staged}"],
Disabling
The git documentation on hooks says that the pre-commit hook can be bypassed for a commit with the --no-verify option.
Or you can manually disable the autoformat for a while, like this:
- Take a copy of
.husky/task-runner.jsonfor when it’s time to re-enable it. - replace the contents of
.husky/task-runner.jsonwith:
{
   "tasks": [ ]
}
Teamwork
Depending on your team, you might want to keep this setup locally, or commit the files in .config and .husky to git so that the whole team has these tools. It’s probably better to make this decision after discussion, rather than surprising your colleagues with it!
It’s certainly better when everyone does it. But you can still use Husky.NET for formatting yourself without that.
CSharpier
There is another code formatter, CSharpier. It can be integrated into husky and git in a very similar way, just with a different .husky/task-runner.json. The documents are here.